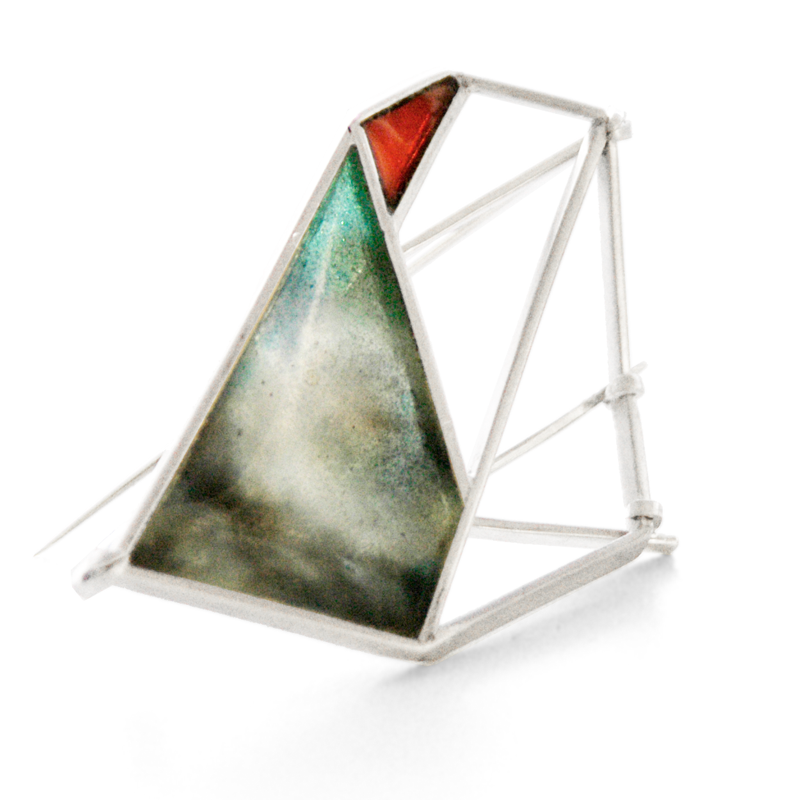
Plique à jour enamel (also know as window enamel) is one of my favourite enamelling techniques. The enamel looks like a see-through window panel held in only by the glass fusing to the inner edges of the window’s frame. It is a beautiful and delicate looking technique, that seems like a bit of magic is keeping these beautiful pieces of colour suspended in jewellery.
It’s also one of the most fussy techniques in enamelling, because you run the risk of the enamel overheating and melting out the enamel from it’s frame as it fuses in the kiln. Traditionally, enamelist were limited to how big they could make each window opening, for fear of the enamel melting out.
In this article, I will show you how I learnt to make plique-à-jour enamel for large window openings in jewellery.
First, I begin by creating a piece of jewellery with window frame openings that will later be filled with enamel. It is important to used extra-hard solder when making these frames, because the melting temperature of regular solder will melt in the kiln. Some artists use a single sheet of metal and cut out the windows, but for me I use pieces of rectangular wire to fabricate delicate branch like structures to hold the enamel.

In these pieces, I have used sterling silver (925) for the frame and hard silver (800) for the pins of the brooches. After the piece is fabricated, I will need to “depletion guild” the silver, so that the pure silver will be brought to the surface. This is important, because enamel does not like to fuse to sterling silver, and prefers either pure silver, pure copper, high carat gold, or platinum.

After the frame is finished, I will add a thin copper sheet to the back of the area I wish to add enamel. This copper sheet will be about 0.1mm thick, so that it will be easy to bend later. I give the copper sheet tabs around the edges of the opening that will be folded up and holds onto the window’s frame.

In the enamelling room, I will set the temperature for the kiln around 750 degrees Celsius (1400 degrees Fahrenheit) for my first firings with the foil backing on.

The enamel powder will first be “washed” to remove the smallest and finest grains of powder, which would make the enamel look a bit cloudy once fired. Then the enamel powder is packed into the openings using small paint brushes. This is the part of the process I really enjoy. This is where I can mix my transparent enamel colours together as I pack them into the openings. Transparent enamels will blend colours with each other as they fire to create a luscious and blurry watercolour effect. After firing, I will repeat this step another 2 or 3 times until the whole depth of the window opening is fully filled.

Once I am finished enamelling the piece, I will then remove the copper foil backing. This is done by pealing the copper foil off, as though it were the lid of a can. Under the foil there will be a layer of copper oxide and also likely some excess enamel that will need to be filed off using a diamond file.

The piece will need to be fired one more time in the kiln after the piece has been filed, firing temperature of the kiln for this stage, because of the risk of the enamel melting through the opening. I will set the kiln to 700-725 degrees Celsius (or 1300-1350 degrees Fahrenheit) and will keep a very close attention to it while it’s firing, so that I can take it out at just the right time.
For one of my latest jewellery pieces, “Piece of the Sky”, I finished it by setting the enamelled frame into a custom brooch setting. Using this plique à jour enamel technique allowed me to fill an unusual shape with colour and to create the illusion of a sky image within the glass.


References:
“Bridging the Gap – Plique a Jour with a Profound Twist”, Glass on Metal, Bill Helwig, Volume
21, Number 4, August 2002, [ http://www.glass-on-metal.com/pastart/bridging_the_gap.htm ].
“Plique à Jour”, Cloisonne and Enamel Jewelry Making: Patsy Croft’s Enamel and Goldsmith
Blog, Patsy Croft, 8th October 2011, [ http://alohilanidesigns.com/plique-a-jour-2/ ].


